Next day, I was in my grubs by 8:30 and had the sink installed by 9:30. Alexandra said, “ Don’t you have to put down a sealer or something? I’m just asking.” The beads of sweat popped out on my forehead. Getting it in hadn’t been so much fun I wanted to do it again. I checked the manual and lay down under the sink, again. Fortunately, it didn’t take too long to rectify the situation. I got my bead on it, hoisted it into place, then, Alexandra went around the sink looking for cracks as I shined my work lamp at the seam.
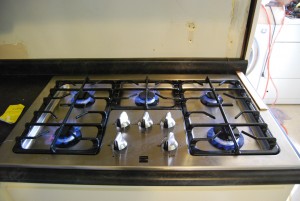
We filled in the cracks by hoisting the sink up a bit and packing them with silicone until the seal looked complete. I bolted the SOB in place for the second time. Next, the disposal. Yes, it is a classic In-Sink-Erator. I took the drain piece out to the garage and buffed it on the wire wheel. I followed the YouTube instructions for installing the drain portion with its retaining collar underneath, using plumbers putty to seal the drain in place. The next part was easy. The disposal is mounted to the sink assembly by holding it in place and turning it a quarter turn. It just slides up these slanted tabs and locks right into place. I had this in the forefront of my mind this from almost squishing my face (for the umpteenth time in this life) when it dropped free missing my face by inches during the dismantling process. The disposal locked right into place. Now, it was maybe 11 a.m.. Alles in ordenung. On to the cook top and the now legendary balancing act I did with John’s help to retrieve the retaining bracket.
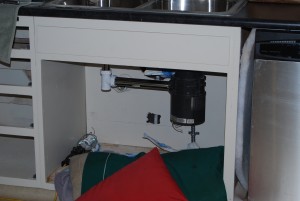
I was sure glad to get that bastard where it belongs, gripped by the neck with garbage pouring down its throat. Try to crush my face will it? You can see the set up wth the plastic t-joint here, before I got the metal one at Pagaanos, triggering a whole new set of pipes.
John was giving me a hand with the job; Alexandra was probably holding the household together, as she did all through the remodel, getting groceries. Cook tops are simple things, when you take off the grills and flame spreaders (not the official name). It a big sealed aluminum thing you don’t want to dent or scratch while installing so you don’t have to look at a dent for the next 10 years knowing you did it in a moment of carelessness. Now, I’m already out of code as the cook top instructions distinctly say to use a connecting hose no longer than three feet. Ours is four, so I don’t need to pile up another felony by leaving out a fiber gasket or some damn thing.
I check the manual. No gasket required. Whew. Unlike the old cook top, which was held in place by only its own weight, this one comes with two clips (see photo) with little hooks that slip into slots on the cook top and then are screwed tight to the countertop bottom. John and I get the cook top in place, lift out the inside edge and get the first clip into its slot and, as I hold the clip in place, wiggle the cook top into its hole and I get a screw into the clip but leave it loose. All good.
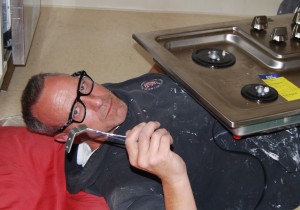
So, this monster was standing straight up on my chest while I fished around in the tiny hole for the required mounting clip. All I have to say is Kenmore, WTF were you thinking when you this thing? Put a frickin' flange on the clip on the ventral side. FM. Getting that thing out of there was nearly on a par with getting the drive wheel hub off the 140, but that story is for a different blog.
I hoist the outside edge up and get the clip into place somehow, then start to lower it down. I asked John to hold the clip in place so it doesn’t slip inside the cook top. Just as I watch his fingers disappear behind the lip where the clip was, I hear the clip slide inside the cook top. Clink. Sliding noise. It is a tragedy. Even supposing Pagano’s or HD could supply a clip, and letting go of the time lost, I’d still have that clip sitting inside my brand new cook top waiting to jump into the works and break it. Logic was no good here. I knew there was a million to one chance the clip would do anything except sit on the bottom of the shell until the unit was chucked out as unceremoniously as I had disposed of its predecessor, but I was not leaving that clip in there. Not without a fight.
I mounted my attack quickly with the precision of a guy who was going to be late for work if he didn’t adjust his valves in 15 minutes flat. I’ve done a lot of awkward jobs and many times I tried to do them without facing the facts: The starter had to come out to get the gearbox out; you have to drain the waterbed mattress entirely to replace the heater; you have to stick your hand all the way in a turkey to get all the giblets. I knew instantly what had to be done and what I needed to do it.
My tools were a butter knife and a pair of hemostats-those locking plier-clips doctors use. I have several pair I use for clipping towels full of ice on my knees. Now for the hard part. I had to get the clip close enough to the tiny hole (see photo), then somehow extract it. There was only one way and I happened to be in just good enough training to manage it. Holding the 45-lb 3×2-foot cook top, I dropped on one knee then sat then leaned backwards levering the cook top so it was on edge, resting on my sternum, pointing at the ceiling. John helped steady it while I rocked it back and forth on my chest to find the clip. It was near the hole, I could tell from the sliding noise. It slid past the hole—excellent! There were no protruding welds or reinforcing walls between the clip and the hole.
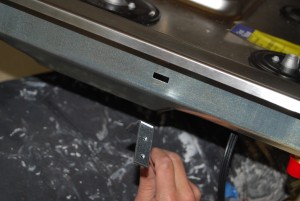
WTF were they thinking? Once it is inside the whole thing is hollow. I still can't believe I got it out on the first try. I knew I couldn't keep holding it upright and it would get John, me or the newly painted cabinets sooner or later, so was pretty motivated to extract it asap.
So, with the cook top balanced on my chest, I jiggled and tilted it until I could see the clip, then applying a skill born extracting hundreds of coins from piggy banks, I used the knife to bring the clip almost upright. Then, most precariously, I held the knife on the clip with my left hand, only my left elbow and knee (remember I’m flat on my back) and John keeping the cook top from slipping off and crushing my arm or head. With care born of the knowledge I would just have to repeat the process if I failed, with my right hand, I got the hemos and ever so gently locked them onto the edge of the clip. A moment or two later and the clip I had never really expected to see again lay in my hand (see photo).
With little ado, we finished the mounting. Hooking up the gas was almost anti-climactic after the clip recovery mission. I slowly, with a deal of force, opened the gas valve. It was almost disappointing to smell no gas. The good people at Kenmore had supplied two tubes, one of thread seal and one for checking gas leaks (basically liquid soap which will bubble up over a leak not unlike how a tire technician checks for leaks). No leaks. Lunch time. Next up, plumbing the sink.
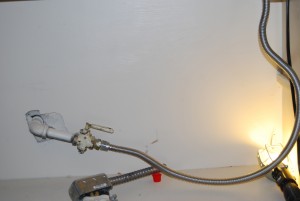
Here we are with a limp electrical outlet with exposed wiring below a gas fitting. The electricity was not live.
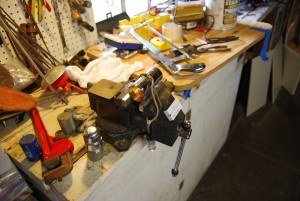
You have seen pipe cutting rigs on the back bumpers of service trucks and probably not recognized them. I've done some hydraulic line making, and I've done some halff-assed plumbing in rentals I've lived in, so when push comes to shove-that is to say we own the place--I can do a pretty tight job. Anyway, I used thise hold-down sucessfully and didn't warp the pipes, made a lot of cuts.
This was an interesting job. I bought all the stuff at Home Depot, as described, but the T-joint was plastic—they were out– everything else was high quality chromed metal. I had actually cut the pipes Friday night and was ready to go Saturday morning, but went to Pagaono’s to get the final drain pipe fitting adaptor.
So Pagano’s has the t-piece in metal, I buy it, get the damn pipe complex half assembled and realize the pipes all need to be re-cut by ¼ inch due to the t-joint being a different size. If you’re not laughing, you should be. I bought new pipes at Pagano’s (thereby creating some sort of balance in the Universe for A)having to redo the job but for the best of reasons and B) getting a bunch of the pieces in the second round from the local hardware, while having purchased the original pieces from the big box retailer), headed back to the bench, sawed through a bunch more chrome-plated brass and finally, finally, fitted the pieces all together.
I tightened everything up. Stood up, and, with John watching, ran the water. I stuck my head under the sink. One tiny leak in the tail pipe where it met the strainer (drain). I tightened it up with my trusty pipe wrench and that job was done. It has been six weeks and nary a drop from the sink. Take that stereotyping cartoonists!
With all appliances working we could start putting shelves in and doors on.
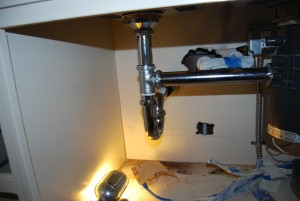
Let me be perfectly honest here. There are are over one trillion cartoons depicting husbands screwing up plumbing repairs and that is by and large an accurate picture. If you haven't thought long and hard and had a bit of practice on things that really counted, you probably should not get under your sink with a wrench. I was largely motivated to avoid being the doltish husband with a puddle forming under him while his wife hovered nearby holding the phone and biting her nails.
Okay, so I’m pretty tired of cataloging my every move, so am cutting off this blog after one more post, which will be almost all photos. The whole shebang is basically done. I messed up about four holes in the drawers and cupboards and patched them, then, all the cupboard doors went on—didn’t strip a single hole. I did have to sand some paint off the inner jambs where cupboard doors met, but now everything closes nicely.
Making the sill was the one piece of artistry I had into this kitchen, and you’ll see that in the final almost-all-photos installment, ready in just a few days. That and the tile job, which was of great interest to me. As I thought, simple actions, but details like corners have to be thought out. My Google Analytics count is at 192, and if I can get it to pass 200 for a split second, I can call it a goal and move on. Maybe I’ll do the next one on the three-month run up to a national fencing tournament. Thanks for reading—this has been the biggest single writing project I’ve taken on and dammit I haven’t earned a nickel, violating the writer’s credo, well, my credo: never write for free. I’m calling this market research—interesting to watch the google graph rise and fall.
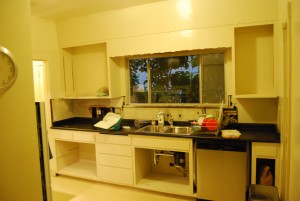
Danged if it doesn't look like a kitchen, again. One of the most rewarding parts of this whole effort has been surprising my dear wife with the extent I'll go to to get a quality job. Surprised myself, too. Pulled nails I could have hammered to the side, trimmed the undersides of the cupboards, all kinds of weird little things. Worth every freakin' minute of it.
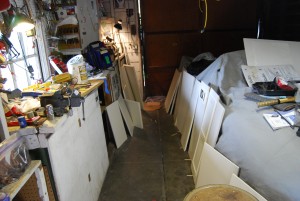
The remainder of the doors setting up inthe garage. Got 'em all handled and hinged and slapped them on over the next week as we had time to work together--Alexandra would hold the door in place and I'd run the screws in.
Read the whole story in order, if you want:
1. The whole story started with the hood installation in mid-June
2. Things really got cooking before we left for vacation
3. Sanding and Send-Offs, a Busy Summer approaching
4. More Pre-Work Work, John Proves a Stand Up Guy
5. Kitchen Mission Day One: Bye Bye Home-Cooked Meals
7. Kitchen Mission Day Three: Airless Sprayer, an Epic Struggle
8. Kitchen Mission: I Bond with the Journeymen and the Resurrection goes on
Latest News
- Teachers bring new methodologies, in-depth studies and sunshine to classrooms through Vegesna grants
- Feature: Entrepreneurship and Beyond: Skills learned in incubator classes guide startup development and pay off in life
- Harker Communication Office Wins Prestigious Awards
- Harker Quarterly Wins CASE Award of Excellence
- Harker in the News


